- Are all the products you sell on your website?
- How many items are in each case?
- What does it mean when a design is On Demand?
- What size tin or plastic tub should I buy?
- Are your products made in the USA?
- Can I put food directly into your tins?
- What are plastic tin inserts? Do I need them for my product?
- How do I use your 3-way popcorn tin dividers?
- How do I use your padded tops?
- Is there a way to seal my tins shut?
- How do your individual mailing boxes work?
- What are your tins and plastic trays made of?
- Can I refrigerate or freeze your tins?
- Can I bake in your tins?
- Can I pour fudge into your plastic inserts?
- Do I need to wash your tins before using them?
- How do I clean your tins for reuse?
Are all the products you sell on your website?
Yes, all the products we sell are shown on our web site. If you don’t see a specific color, design or size tin on our site then we do not carry it.
How many items are in each case?
That depends on which item you choose. The number of items per case can be found on the product page.
What does it mean when an item is On Demand?
On Demand tin designs are printed to order. The minimum order will be 96 pieces* per item during the holiday season (August-December). The minimum order will not apply before August 1. Because these tins are not stocked in our warehouse, the lead time will be longer, typically 1-2 weeks but will increase in the fall and winter.
*90 pieces for 3C, 80 pieces for 115.
What size tin or plastic tub should I buy?
The best way to determine the right size tin or tub for your product is to create a simple template. All you need is a ruler, pen or pencil, and a blank sheet of paper. You'll be creating a simple schematic that matches the diameter of the tin you are considering. You can find the dimensions of each tin or plastic tub on the product page or on our Tin Sizes page.
As an example, let's choose our 3C size tin which is 8 1/8" diameter x 3" high. Keep in mind that all measurements are for the inside dimensions of the tin.
- Using a ruler, create a "+" shape on the paper by drawing two 8 1/8" straight lines that intersect at the midpoint.
- Starting at the top of the "+" shape, draw a curve connecting the end points of each line, moving in a clockwise direction and forming a circle as you go. Remember, this exercise is just to give you a visual of the shape of the tin. The circle does not need to be perfect! You can also use a plate if you have one with a dimension that is as close as possible to the tin you are interested in.
- Place your product inside the circle to determine how many will fit from side-to-side, and use a ruler to measure the depth.
- For products that are not stackable such as nuts or small candies, put your product in a plastic bag and hold it up to the approximate width of the tin.
Are your products made in the USA?
The vast majority of the products we carry are made in the USA. The description on each product page will indicate whether the product is made in the USA or imported.
Can I put food directly into your tins?
Yes! Our tins are manufactured using FDA-approved components all the way down to the waxes & lubes, so our tins are food-safe. For a neat and professional presentation, we do recommend using some kind of liner inside the tin, such as our tin inserts and padded tops.
What are plastic tin inserts? Do I need them for my product?
Our plastic inserts lend a professional look to the contents of your tin, and can even be used to separate multiple products. We carry inserts that fit all our round, square and rectangle cookie tins.*
Plastic inserts are heat resistant up to 150° — perfect for pouring fudge directly into a tin.
To use the insert, simply place it inside the tin then gently push the edge of the insert down until it locks snugly under the inside lip of the tin. That’s all there is to it!
*Plastic inserts are not available for tall round tins, popcorn tins, or seamless tins.
How do I use your 3-way popcorn tin dividers?
Available for our 8S, 15T, 25T, and 50T tins, these dividers are perfect for retailers who sell multiple flavors of their product in one tin. The dividers are simple to use and can separate your goodies into two or three sections. You can even use two dividers to separate the contents into four sections.
How to use our 3-way dividers:
- Place the divider on a table with the glossy side facing down and the two short sides on each side. The widest part of the divider should be in the middle.
- Notice the perforated seam in the middle of the divider that moves straight up and then changes from being perforated to completely unattached. To construct the divider, fold the left side over to meet the right side. The divider will begin to take the shape of the tin.
- To create a 3-way divider, hold the divider in your hand and separate the two perforated panels along this line.
- To create a 2-way divider, keep the panels together when you place the divider into the tin.
- To divide your tin into four separate flavors, use two dividers back-to-back with the flaps extended in opposite directions.
How do I use your padded tops?
Our padded tops are similar to the pads that you will find when you open a box of Valentine’s Day chocolates. White with a subtle gold stripe pattern on one side, our pads give a professional, finished look to your packaged product and help to stabilize it during shipping. To use the pad, simply place it on top of your goodies to form a protective layer between your product and the tin lid. Some of our customers use a pad or two on both the top and bottom to help reduce breakage in shipping.
Is there a way to seal my tins shut?
Absolutely! We stock tamper-evident heat sealing shrink bands for many of our food-safe tins. These bands are an essential accessory whether you are selling your product from a storefront, shipping to customers, or gift-giving to friends and family. Our bands shrink snugly to the tin cover and body of the tin to keep your product safe. Remember, you will need a Heat Gun to apply the band to your tin.
How to use tamper-proof shrink bands:
- Remove a band from the sleeve.
- Slide the band down over the cover and center it so that half of the band is on the body and half is on the cover.
- Using the heat gun, carefully apply heat to the band and slowly go around the whole diameter of the tin. Keep heat several inches away from shrink band as the shrinking process is very quick and if heat is applied for too long, the shrink band will split or tear, making the band unusable. Don’t get discouraged if the first several times you try it and the band splits — you will get the hang of it!
How do your individual mailing boxes work?
Our boxes are perfect for shipping your product to clients, family, and friends across the country. We offer three styles – Fliptop Individual Mailing Cartons, Red Bow Individual Mailing Cartons, and Popcorn Tin Individual Mailing Cartons. All are very durable and can handle even the roughest ground deliveries!
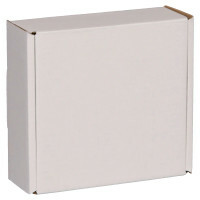 White Flip Top Boxes
Similar to a pizza or cake box, the white flip top box can securely ship many of our shallow tins. To assemble the box, begin by placing the box in front of you, brown side up, with the two slits pointed toward you. This is the bottom of the box. Next, fold the panel at the bottom upward (look for the scored line on the panel). Then, fold the next crease toward you (this crease is also slightly scored). Fold the tabs on each end so that they meet just over the slits. Gently fold over the panel on the left side and slide it into place. The tab will remain in place to create the side of the box. Do the same for the other side to create the box bottom. The part that remains is the box top. To create the top, fold in the wings on each side down so that they are positioned just inside the box. Next, fold the two smaller wings inward and insert into the sides of the base. See the video below for a demonstration.
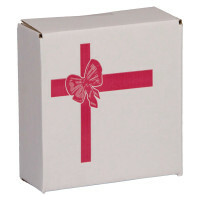 Red Bow Boxes
These boxes are perfect for delivery with flair. Each box is white and printed with a beautiful red bow on the cover. Red Bow cartons are simple to assemble and prepare for shipping. Simply fold the box at the pre-scored creases, slide the tin inside, fold the ends together, and tape shut. We recommend using a strong, clear packing or mailing tape.
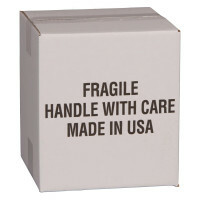 Popcorn Tin Mailing Boxes
Our 15T, 25T, and 50T sized boxes are white with FRAGILE written on one side. To create these boxes, simply fold the box into shape, seal the bottom closed with packing tape, put the tin inside, and tape up the top. Our tall Red Bow boxes fit both 5S and 8S size tins and work the same way.
Congratulations - you just constructed an attractive, durable box!
These individual mailing cartons aren't just for tins! If you place your product in a bag (for example, nuts or trail mix) you can add decorative shred on the bottom of the box and simply place a bag or two of your product directly into the box. This is a great alternative to a tin and makes a very nice presentation. Once you get the hang of putting the boxes together, you will find their construction fast and simple, and you’ll be shipping product out in no time!
What are your tins and plastic trays made of?
Our tins are made of recyclable tin plated steel. They will rust over time if exposed to moisture.
Our Plastic trays are made of Polystyrene.
Can I refrigerate or freeze your tins?
We do not recommend refrigerating or freezing our tins because condensation will cause the tins to rust over time.
Can I bake in your tins?
The tins we sell are intended for food storage and are not recommended for baking. Clambake cans are made especially for steaming using a small amount of water.
Can I pour fudge into your plastic inserts?
Yes, you can pour fudge into our inserts but you will need to let the fudge cool to 150° before pouring.
Do I need to wash your tins before using them?
Our tins are food-safe, so it is not necessary to wash them before use.
How do I clean your tins for reuse?
The safest way to clean your tins is to wipe with a clean, dry microfiber cloth, which will remove crumbs as well as oils. If that doesn't do the trick, use a slightly damp (not wet) cloth or paper towel to remove any remaining residue, and follow up with the microfiber to ensure that the tin is dry. The key is to use as little water as possible so that water does not settle into the crevices and cause rust. Do not wash your tins!

